

How To Install Real Stone On A Wall
Modern Stone Installation Tips
Updated: Jun. 16, 2022
Tips for installing veneer stone from a real pro

Modern stone veneer is attractive, durable and virtually maintenance free. We'll have a professional show you cardinal installation tips to employ information technology to your home.
Y'all might also similar: TBD
The benefits of modern stone veneer
If the words "cultured stone" conjure upwards images of a fake that you can spot a mile away, then you demand to accept a look at mod manufactured veneer stone. Today'south versions expect so good that yous'll be hard-pressed to tell them from actual rock. And since manufactured rock is cheaper and lighter than the real matter, information technology's a great DIY choice for any stone veneer project such as a stacked stone veneer fireplace.
There are several national brands of manufactured stone—including Eldorado, Coronado and Cultured Rock—and they all provide detailed installation instructions on their Web sites. Only nosotros were sure that a professional person would accept tons of great tips and communication, and so we enlisted Marcus Schilling, a third-generation mason, to show united states of america how he installs it. And sure enough, we were right.
You tin utilise manufactured rock indoors or out, merely outside applications require special attending to details of waterproofing and flashing. Before installing exterior stone veneer, talk to your local building inspector to see what's required in your area. We'll show y'all tips for installing information technology indoors; however, most of the tips besides utilize to exterior applications.
Stone Veneer in a Nutshell: Installation Basics
Before we launch into the tips, it'southward helpful for you to accept a general idea of the installation procedure. Almost all rock veneer installations start with a layer or two of building paper, covered past properly installed dimpled and galvanized wire lath. The next step is to cover the lath with a 1/two in. layer of Type Southward mortar, which is "scratched" while it'due south still moisture to allow the rock to cling better. Subsequently this "scratch coat" dries overnight, the rock is applied with the aforementioned type of mortar. If you're using stone intended to expect like it'southward dry-stacked—that is, no mortar between the stones—you're done. Otherwise you'll finish the job by grouting the joints between the stones with mortar.
Marcus the Mason
Marcus Schilling was introduced to the world of masonry when he was only 7 years old. He helped his dad with all sorts of stonemason tasks, including conveying pocket-size stones and cleaning up at the terminate of the 24-hour interval. And he loved it from the get-go. His gramps was a stonemason. His grandpa taught his dad, and his dad taught Marcus and his brothers. And now Marcus is teaching his sons—and us!—the craft of setting stones and laying bricks.
Tip 1: Cutting wire lath the easy mode
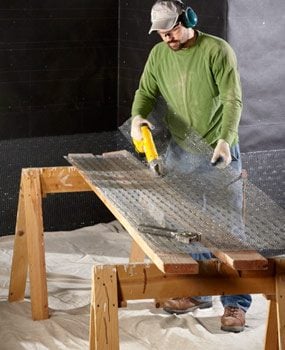
Easy way to cut wire lath
Make long cuts past stapling wire lath to a long lath and cut along a board edge.
Wire lath can be unruly, and the cut edges are sharp. So annihilation you can exercise to go along the stuff under control while you're cut it is a large bonus. Here's a tip from Marcus on how to make long cuts. Lay the wire lath on some long boards. Measure out from the edge of the lath to the border of the lath on each cease so the desired cutting line is lined up with the border of the lath. Then secure the lath temporarily with a few staples. At present use the border of the board as a guide to make the cut. Marcus uses cordless metal shears, only tin snips or aviation snips will also work.
More than tips for working with lath:
- Wearable gloves and safety glasses.
- Cut wire lath with big tin snips, ability metal shears or a diamond blade mounted in an bending grinder.
- Prebend board at inside corners. Bend it over a board earlier putting it in place.
- Brand sure the lath is installed so it feels rough when your mitt is going up, and polish going down. Yet, information technology'due south important to check with your specific board manufacturer guidelines, as they may give different instructions.
Tip 2: Speed up troweling for modern rock veneer
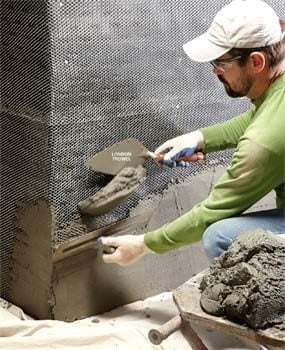
Spread mortar faster
Employ a 2-trowel system to quickly spread mud evenly in the lath on the wall.
Marcus swears this is the fastest way to become the mud on the wall. Prop up your mud board nearly 16 in. high and within easy reach. Load it with mortar. Then apply your London trowel as shown to transfer the mortar from the mud lath to your trowel. Pull the trowel up the wall to embed the mortar in the lath.
What kind of mortar should you use?
You'll detect recipes for mixing your own mortar in the stone manufacturer'due south instructions, but Marcus uses premixed Type S mortar that'due south labeled for employ with veneer stone. Special additives are already included—all yous add is water. Look for it at masonry suppliers or ask near information technology when you buy your stone.
Tip: When installing "dry-stack" stones, use a colored mortar or dye the mortar to match the stones.
Tip 3: Use a tile trowel to scratch the mortar
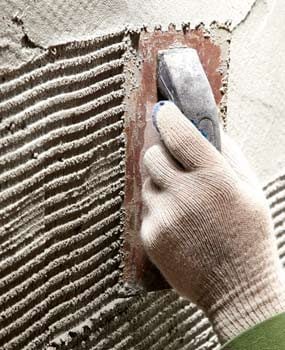
Scratching the rock veneer mortar
An inexpensive notched tile trowel works well to prepare the stone veneer mortar for solid bonding.
Find one of these mortar trowels here.
Grooving or scratching the wet mortar provides a better bond for sticking on the stones. Y'all tin buy a special rake-similar tool for this, but Marcus prefers to use a 3/16 in. square-notched tile mastic trowel. They're cheap and easy to find at home centers and hardware stores. Only drag it across the wet mortar to brand horizontal stripes.
Tip four: Stick on the stone like a pro
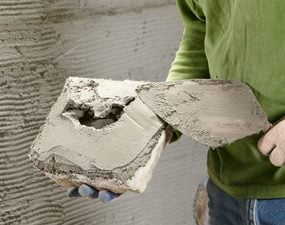
Use mortar to the veneer rock
Employ mortar to the behind perimeter of the veneer stone and press it in identify.
Marcus makes a swipe across the unabridged back of the stone with the trowel first to create a expert bond for the mortar bed. And then he wipes mortar from the trowel all around the perimeter. This creates a piffling hollow spot in the middle that will act equally a suction cup to concur the stone in place until the mortar hardens. The fundamental is to put on enough mortar to create almost a 1/2 in.-thick layer when the stone is pressed against the scratch coat. If any mortar oozes out around the edges, knock it off with the trowel so it doesn't get in the fashion of grouting.
Tip 5: Disguise the cutting ends of stones
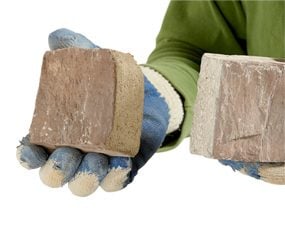
Hibernate cut ends of veneer stone
Hide sharp end cuts by cut angles, chipping or coating the end with mortar.
Occasionally you'll accept to cutting stones to fit. Marcus uses a ten-in. chop saw equipped with a dry-cut diamond bract. But if y'all're doing just one job, you tin can get by with a diamond blade mounted in an angle grinder. Regardless of the tool you lot use, you'll want to disguise or hibernate the cut ends. After cutting a stone, Marcus cuts angles on the corners to make them wait more natural. You can also apply a tile nipper or horse-hoof trimmer to bit away at the abrupt edge left by cutting. Marcus chooses sparse stones to cut if possible. And so he hides the cut edge against a thicker rock. And if he'south using mortar that'southward dyed to match the stone, as y'all would in a dry out-stack installation, Marcus butters the stop of the rock so it blends in better.
Tip 6: Cut off the tip of the grout pocketbook
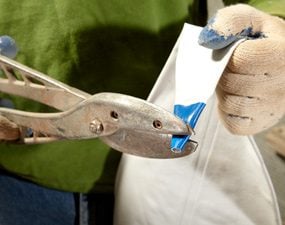
Trim the grout bag tip
Trim the grout bag tip to near a v/8 in. opening and brand sure your mortar mix oozes out easily.
Grout numberless come up with either metal or plastic tips. Marcus prefers the plastic tips for grouting stone. He cuts the tip to create an opening that'south nigh five/8 in. in diameter to allow proper mortar flow. Marcus says a common mistake is to mix grouting mortar likewise stiff. Make sure the mortar is loose enough to ooze from the tip without having to clasp the bag.
Tip 7: Fill the joints completely
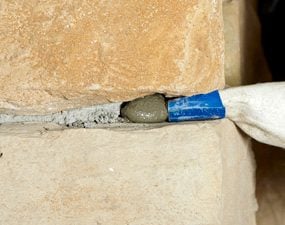
Avoid hollow joints
Fill joints completely. The grout will shortly fall out of partially filled joints.
Marcus says he often encounters hollow grout joints on piece of work done by beginners. Be careful to make full the joints full from back to front as you're grouting. Joints that are hollow underneath volition fall out later on. Proceed the tip pressed deep into the joints so they get filled from the back to the front of the rock.
Tip viii: Rinse the numberless to avoid grout build-upwardly
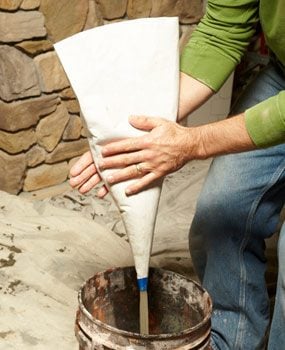
Rinse the grout bag
Marcus recommends rinsing out the pocketbook after every third bagful of grout. Otherwise sand builds upward along the edge, clogs the tip and makes grouting difficult. Merely fill the empty purse with water and rub information technology back and forth to dislodge the caked-on grout.
Tip nine: Yous don't need a special tuckpointing tool!
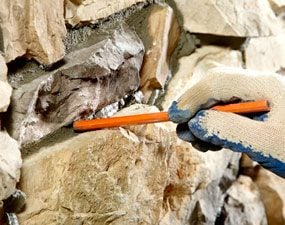
Tuckpoint with a carpenter'due south pencil
Rake backlog grout and shape the joints with a carpenter's pencil.
Marcus finishes the joints using a 3/8 in.-wide tuckpointing trowel that he's cut off to about 5 in. long. He says well-nigh masons prefer the shorter length because it gives them much better control. But he says a carpenter'south pencil is a great alternative. It's the perfect size and shape for striking your grout joints. Let the grout set up until it's business firm to the touch merely non hard. Normally this is most xx to thirty minutes. Then rake the pencil over the grout to polish and shape it. Finish up by brushing off any loose mortar with a soft masonry castor.
Tip 10: Wait! Don't wipe off that wet mortar
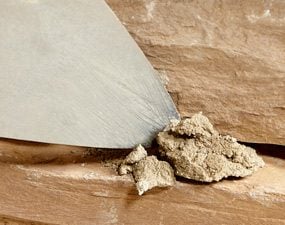
Flick mortar lumps away
Permit mortar lumps harden slightly, then flick with away to avert smearing.
When you spill a glob of mortar on the stone, which is almost certain to happen, exit information technology alone. Let the mortar prepare up near thirty minutes. And then film the partially hardened mortar off with the tip of the trowel. Dab the remaining residue with a damp rag to remove it.
Cleaning Manufactured Stone
A lot of people clean their manufactured stone wrong during installation, according to masonry skillful Morris Rozema. "People recall they'll exercise their cleanup at the finish of the project. But by then it's also tardily to remove hardened mortar or grout without the hazard of damaging the stone. Yous need to clean upward at to the lowest degree daily. This is not optional, and I tin't stress this enough."
When it comes to maintenace cleaning, scrub dirt off manufactured stone with a strong-bristle brush using a mild detergent and water. For tougher cleaning problems, Rozema suggests using ane office white vinegar mixed with 8 parts water.
"Premoisten the stone with clean water, dip a plastic or brass brush (never utilise a steel wire brush on manufactured rock) in the vinegar/water mix and lightly scrub the expanse. Then rinse the area immediately with clean water to remove all of the vinegar/water mix from the surface."
Although most synthetic stone manufacturers warn against using harsh cleaning or bleaching products or pressure level washers on their stones, Rozema says he'due south used them on severely stained and moldy areas of stone at his ain dwelling house without agin effects.
"But I always exam the cleaner or bleach in an out-of-the-way area to run into if the rock or mortar color runs." Rozema cautions that the use of virtually all cleaners/bleaches/acids or force per unit area washers can void the manufacturer's warranty. "If y'all utilize these things, go along with extreme caution and at your ain take a chance."
Meet the cleaning expert:
Morris Rozema has been involved in the masonry manufacture for more than forty years and is the president of Sandy Rock & Brick, a masonry supply business in Sandy, Oregon.
Required Tools for this Project
Have the necessary tools for this DIY project lined up before you lot beginning—yous'll save time and frustration.
You'll also need gloves and a grout bag.
Required Materials for this Project
Avoid last-minute shopping trips by having all your materials ready ahead of fourth dimension. Hither's a list.
Originally Published: June 27, 2022

Source: https://www.familyhandyman.com/project/modern-stone-installation-tips/
Posted by: ellisatrace.blogspot.com
0 Response to "How To Install Real Stone On A Wall"
Post a Comment